This guide walks through the full process: setting goals and a realistic budget, designing around how you actually live and cook, assembling the right team, understanding the correct order of operations, managing the project day to day, and protecting yourself when setbacks hit.
Key Takeaways
- Start with an honest audit of what isn't working—this filters every design and budget decision that follows.
- Budget 15–20% above your base estimate as a contingency reserve, separate from any upgrade fund.
- Finalize every design decision and order all materials before demolition begins to prevent delays.
- In Los Angeles, qualified designers and contractors book months out; start your search during the planning phase.
- The correct installation sequence—flooring → cabinets → countertops → appliances → finishes—must not be reversed.
Set Your Vision, Goals, and Budget Before Anything Else
Audit What Isn't Working First
Start with an honest assessment of your existing kitchen. Walk through it during a typical cooking session and note:
- Layout pain points — poor workflow, too little prep space, awkward traffic patterns
- Storage shortfalls — insufficient cabinet depth, no pantry, cluttered counters
- Appliance deficiencies — underpowered range, undersized refrigerator, poor ventilation
- Lighting gaps — dim task lighting, no under-cabinet illumination, flat overhead fixtures
This list becomes the filter for every decision ahead. If a feature doesn't address something on it, it belongs in the nice-to-have column, not the core budget.
Separate Must-Haves from Nice-to-Haves
When trade-offs arrive—and they will—you need a clear hierarchy already decided. Divide features into two tiers before design begins:
- Must-haves: Adequate counter space, sufficient cabinet storage, properly placed appliances, functional ventilation
- Aspirational: Statement island, custom range hood, imported tile, built-in coffee station
Protecting must-haves under budget pressure is far easier when you've committed to the list before emotions run high mid-project.
Build a Realistic Budget With a Contingency Reserve
Los Angeles homeowners should plan around current market data. According to the 2025 JLC Cost vs. Value report, kitchen remodel costs in the LA market break down as follows:
| Scope | Los Angeles 2025 |
|---|---|
| Minor remodel, midrange | $29,765 |
| Major remodel, midrange | $86,214 |
| Major remodel, upscale | $171,369 |
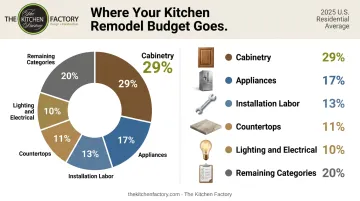
As a planning proxy, here's how a typical kitchen remodel budget is allocated:
- Cabinetry — ~29% (the largest single line item)
- Appliances — ~17%
- Installation labor — ~13%
- Countertops — ~11%
- Lighting and electrical — ~10%
- Plumbing, flooring, backsplash, and miscellaneous — remaining ~20%
Every budget needs a dedicated contingency fund of 15–20% of total project cost. NARI recommends this buffer specifically to absorb surprises uncovered during demolition—outdated wiring, hidden water damage, structural issues—not mid-project upgrade temptations. Keep it in a separate mental bucket and treat it as an emergency fund.
Design Your Kitchen Around How You Live and Cook
Choose a Layout That Supports Your Lifestyle
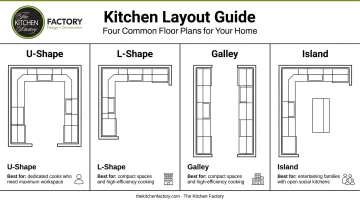
Four layouts cover the vast majority of kitchen remodels, each suited to different households:
- U-shape — Works best for medium to large kitchens with multiple cooks; maximizes counter and storage run
- L-shape — Suits small to medium spaces and open-concept areas; leaves the room flexible for entertaining
- Galley — Efficient for narrow spaces and single-cook households; keeps the work zone tight
- Island — Ideal for larger kitchens focused on entertaining; adds prep space and a social gathering point
Every layout decision should reference the work triangle—the travel path between refrigerator, sink, and range. NKBA Kitchen Planning Guidelines specify the three legs should total no more than 26 feet, with no single leg shorter than 4 feet or longer than 9 feet, and no major traffic pattern cutting through the triangle.
Beyond geometry, the layout must reflect how the household actually uses the space: How many people cook simultaneously? Does the kitchen open to a living or dining area? Is it a serious cooking environment or primarily social?
Select Materials That Balance Aesthetics and Longevity
Material decisions must be finalized before ordering begins. Key choices include:
- Cabinetry construction — Plywood boxes resist warping and hold fasteners well over time; MDF offers a smoother paint surface but is heavier; particleboard is the weakest long-term option for box construction
- Countertops — Engineered quartz remained the most popular choice among renovating homeowners in the 2025 Houzz Kitchen Trends Study, selected by 39% of respondents, followed by granite at 19%
- Flooring and backsplash — Choose materials rated for kitchen conditions (moisture resistance, durability underfoot)
- Hardware finishes — Brushed metals hold up better in high-use kitchens than polished or plated options
Timeless material choices protect the investment. Zillow's 2025 analysis found quartz countertops correlate with a 2.6% sale premium and Shaker-style cabinets with a 1.4% premium—both considered classic rather than trend-driven selections.
Work With a Design Professional Who Understands How You Cook
A full-service kitchen design firm prevents the costly mid-project changes that derail timelines and budgets. When every decision is made and approved before demolition starts, contractors have no ambiguities to resolve on your dime.
The Kitchen Factory's eight-stage design process illustrates how this works in practice. It covers:
- Vision conversations focused on cooking habits, storage needs, and lifestyle priorities
- Space planning with 3D renderings and showroom walkthroughs for cabinetry selection
- Onsite measurement verification before formal design sign-off
Only after that approval does construction on custom cabinetry begin, with all products specified and lead times confirmed. Their single-point-of-accountability model — built over 30 years designing kitchens across the greater Los Angeles area — means one team manages the project from first consultation through final installation.
The cardinal rule: finalize every design decision and order all materials before demolition begins. Starting demo before cabinetry is on-site is one of the leading causes of extended project timelines.
Assemble the Right Project Team
Finding the right people is as important as finding the right design. When vetting contractors, look for:
- Valid California contractor's license (verify at CSLB's online license lookup)
- General liability and workers' compensation insurance
- A portfolio of comparable kitchen projects—not just general renovation work
- Verifiable references from clients with similar project scopes
- Clear answers about who will be on-site daily
Collect at least three detailed quotes and evaluate them on communication quality and scope clarity, not price alone. The lowest bid rarely reflects the full scope.
A dedicated project manager (whether from your design firm or a separate GC) is worth having on any substantial kitchen remodel. Their responsibilities typically include:
- Sequencing and scheduling specialized crews
- Tracking budget against actuals
- Serving as your single point of contact
- Resolving issues before they escalate
- Conducting the final punch-list walk-through
For Los Angeles homeowners specifically: qualified contractors and designers in this market are frequently booked several months out. Start your contractor and design firm search during the planning phase, not after you've finalized your design.
California law also limits the initial deposit on home improvement contracts. Per California Business and Professions Code section 7159.5, the down payment cannot exceed $1,000 or 10% of the contract price, whichever is less.
The Kitchen Remodel Order of Operations
Pre-Construction: Permits, Ordering, and Setup
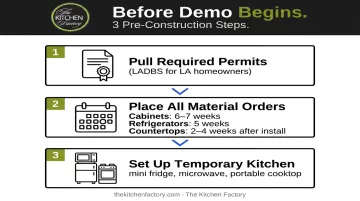
Three things must happen before any demo begins:
- Pull required permits : In Los Angeles, LADBS requires permits for electrical, plumbing, and structural work (requirements vary by municipality). Layout changes or structural modifications require formal plan review; simple fixture replacements may qualify for express permits. Uninspected work creates serious problems at resale.
- Place all material orders : Cabinet lead times currently average 6–7 weeks nationally per NKBA data; refrigerators run approximately 5 weeks; countertop fabrication adds another 2–4 weeks after cabinet installation. Order early.
- Set up a temporary kitchen : At minimum, a mini fridge, microwave, and portable cooktop. Going 6–10 weeks without any cooking setup forces rushed decisions and adds stress to an already demanding process.
Demolition and Rough Construction
Once permits are approved and materials are on order, demo can begin. This phase covers:
- Removing old cabinets, fixtures, flooring, and any walls scheduled for relocation
- Completing structural changes before any rough-in work begins
- Rough-in sequencing: plumbing first, then electrical and HVAC, followed by inspections before insulation and drywall close the walls
Per IRC R109, all systems to be concealed must be inspected and approved before concealment. Skipping inspections to save time creates expensive problems later.
Structural changes add significant time to this phase. Budget extra weeks if walls are moving or load-bearing elements are involved.
Finish Construction and Installation
Each trade follows the one before it — install things out of order and someone has to redo their work:
- Flooring : Goes in before cabinets for most floor types (hardwood, tile). Floating floors like laminate are the exception — install cabinets first per manufacturer guidance.
- Cabinets : Installed after flooring is complete
- Countertop templating : Measured only after cabinets are fully set. Fabrication typically takes 2 weeks; installation runs 2–5 hours.
- Appliances and plumbing fixtures : Follow countertop installation
- Lighting, backsplash, hardware, and paint touch-ups : Finish the space
With major installation complete, the final step before closing out the project is a joint walkthrough. The homeowner and project manager move through the space together, documenting every outstanding item: missing hardware, uneven gaps, fixture adjustments, paint touch-ups. Final payment should be withheld until every punch list item is resolved.
Managing Your Project Day to Day and Handling Setbacks
Stay Accessible Throughout Construction
Real-time decisions surface constantly during a remodel: material substitutions, unforeseen conditions, layout adjustments. An absent homeowner forces contractors to make assumptions that may not align with your original vision. Stay reachable and make yourself available for questions same-day.
Establish a clear communication rhythm:
- Schedule weekly check-ins with the project manager or lead contractor (in-person or video)
- Confirm every decision and change order in writing — email or a project management app, not verbal agreements
- Issue formal change orders for any scope addition or substitution, specifying revised cost and timeline impact before new work begins
Change orders add up fast — Consumer Reports data found they tack an average of 10% onto total project costs. Capturing them in writing before work starts is the most effective protection against end-of-project disputes.
Protect Your Budget From Common Setbacks
The most frequent remodel setbacks are:
- Supply chain delays on custom cabinetry or specialty appliances (order early, build buffer weeks into the schedule)
- Hidden damage discovered during demo—water damage, outdated wiring, mold
- Permit inspection hold-ups from incomplete documentation or municipal backlogs
Each of these has a financial ripple effect, which is why proactive budget management matters as much as the contingency fund itself. Put these safeguards in place before construction begins:
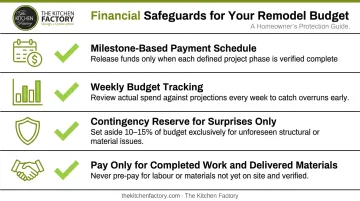
Financial safeguards that work:
- Agree on a contractor payment schedule in advance, tied to project milestones—not calendar dates
- Track actual spending against budget weekly, not at project end
- Keep the contingency reserve untouched for genuine surprises, not upgrades
- Never pay more than what the work completed and materials delivered justify
Frequently Asked Questions
Is $30,000 enough for a kitchen remodel?
In Los Angeles, $30,000 aligns with a minor or cosmetic refresh—the 2025 JLC data puts a minor midrange LA remodel at $29,765. It won't cover a full gut renovation or luxury finishes; a major midrange remodel in this market runs $86,214. Your scope, material choices, and whether you're moving any walls or plumbing determine whether the budget holds.
What does a remodeling project manager do?
A project manager sequences all specialty crews, tracks budget against actual spend, and serves as the homeowner's single point of contact. They resolve problems before they escalate and conduct the final punch-list walk-through before authorizing payment.
What is the 30% rule in remodeling?
The 30% rule is a budgeting heuristic suggesting homeowners avoid spending more than roughly 30% of their home's current market value on a kitchen remodel. It's widely circulated but not formally established by NAHB or NAR. The intent is to protect resale ROI and avoid over-improving relative to the neighborhood.
What are the 5 C's of project management?
The 5 C's are Communication, Collaboration, Coordination, Control, and Closure. Applied to kitchen remodels, they cover everything from aligning design with construction, to sequencing crews correctly, to confirming every punch-list item is resolved before final payment.
How long does a kitchen remodel take from start to finish?
A full remodel typically runs 6–9 months from first design consultation to final walk-through. The planning, design, and material ordering phase often takes 2–4 months; active construction runs 6–12 weeks depending on scope. Custom cabinetry and countertop fabrication are the most common timeline drivers.
In what order should a kitchen remodel be done?
Most remodels follow this sequence:
Design finalization and material ordering → permits → demolition → rough plumbing and electrical → inspections → drywall → flooring → cabinetry → countertop templating and fabrication → appliances → backsplash, lighting, hardware, and finishing details.