The challenge is that attic closets aren't like standard ones. Sloped ceilings, uneven headroom, limited natural light, and awkward geometry make off-the-shelf solutions a poor fit. Done right, though, an attic walk-in closet becomes one of the most functional and distinctive spaces in a home. Done wrong, it's an expensive storage problem.
What follows are nine practical tips — grounded in real measurements, building code requirements, and material science — for designing an attic walk-in closet that actually works.
Key Takeaways
- Map your headroom zones before buying a single shelf or rod system
- Sloped ceilings are a design asset: tall rods go at the ridge, drawers go under the eaves
- Climate control protects clothing and cabinetry from heat and humidity damage
- Lighting and mirrors are structural requirements in attic closets, not finishing touches
- Custom cabinetry built to your roofline outperforms modular systems in function and fit
Before You Begin: Assessing Your Attic's Potential
The most expensive mistake homeowners make is ordering storage furniture (or starting demo) before mapping how the ceiling pitch actually divides the space. The roofline doesn't just affect aesthetics; it determines which storage types are even physically possible in each zone.
Measure and Map Headroom Zones First
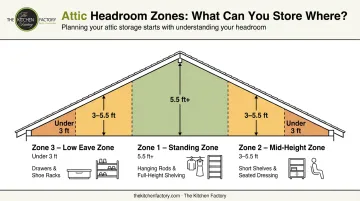
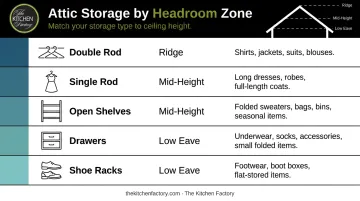
Sketch a simple floor plan that divides your attic into three distinct zones:
- Standing zone (5.5 ft and above): Suitable for hanging rods, full-height shelving, and center islands
- Mid-height zone (3–5.5 ft): Works for mid-height shelves, short hanging sections, and seated dressing areas
- Low eave zone (under 3 ft): Drawers, shoe racks, pull-out bins, and built-in low cabinets only
Per the 2022 California Residential Code R305.1, habitable spaces require a minimum 7-foot ceiling height, with at least 50% of the required floor area reaching that clearance. Areas below 5 feet cannot count toward minimum habitable square footage under R304.3.
A closet-only attic sits in a different classification than a habitable room under California R202. The moment you add fixed stairs, HVAC, skylights, or structural changes, the project triggers plan-check review. Check with your local building department before breaking ground.
Check Structural and Climate Conditions
Two pre-build checks that most homeowners skip:
- Structural load: Per IRC/CRC Table R301.5, uninhabitable attics without storage are rated for just 10 psf live load. An occupied attic closet with custom cabinetry must meet the 30 psf habitable attic threshold. An unfinished attic floor typically cannot support a full built-in installation without reinforcement — get a contractor's assessment before specifying heavy cabinetry.
- Climate control: The DOE notes roof surfaces can reach 150°F or more on sunny summer afternoons. The Smithsonian Museum Conservation Institute targets 45% RH ± 8% and 70°F ± 4°F for textile preservation. According to the Canadian Conservation Institute, biological risk rises above 65% RH, and mold can appear within days at 90% RH. An uninsulated, unventilated attic is not a safe environment for a wardrobe. Address insulation and a mini-split or HVAC duct before installing anything.
Tips 1–3: Design Around Your Roofline
Tip 1: Place Hanging Rods Where Headroom Is Tallest
The ridge — the highest point directly beneath the roof peak — is the only zone with reliable clearance for full-length garments. Based on manufacturer standards from ClosetMaid:
- Single-hang rod (dresses, coats): 70 inches of floor-to-ceiling clearance
- Double-hang system (jackets, blouses, folded trousers): Upper rod at 84 inches, lower rod at 42 inches
- Hanging depth: Standard 24 inches; bulky coats may need up to 28–30 inches
Double-hang systems only fit in the tallest attic zones. If your ridge height is 8 feet, you have clearance for double-hang there — but that zone is typically narrow. Plan accordingly rather than assuming double-hang throughout.
Tip 2: Use the Low Eaves for Built-In Storage
The dead space where the sloped ceiling meets the floor is often left empty or filled with generic bins that can't follow the angle. Custom-built cabinetry is the only real fix — it follows the roofline pitch and reclaims every inch.
Built-in solutions designed for low-clearance zones include:
- Pull-out drawer stacks for folded knitwear, accessories, and seasonal items
- Tiered pull-out shoe racks angled to fit within the eave pitch
- Hinged-lid storage benches for off-season clothing bins
Cabinet depth in eave zones typically runs 18–20 inches rather than the standard 24 — enough for most folded items and footwear without fighting the pitch.
Tip 3: Avoid Placing Tall Units Against Sloped Walls
Floor-to-ceiling bookcases or wardrobe units pushed against sloped walls either leave large unusable triangular gaps at the top or require awkward wedge cuts to fit. Both outcomes waste money.
Tall units work best in two places:
- Flat gable-end walls (the vertical walls at each end of an A-frame attic)
- The central standing zone directly beneath the ridge
For storage along a sloped wall, use modular shelving with adjustable heights — stagger shelf levels to step down with the ceiling pitch and make the taper a feature rather than a flaw. Tips 4–6 build on this logic, covering how to handle lighting, flooring, and the transitions between these zones.
Tips 4–6: Build a Smart Storage System
Tip 4: Mix Storage Types Strategically
A single-category closet — all hanging, or all shelving — leaves large portions of a wardrobe unaccommodated. A well-functioning attic closet combines:
| Storage Type | Best Zone | Best For |
|---|---|---|
| Double hanging rods | Ridge (tallest) | Jackets, blouses, shirts |
| Single hanging rod | Ridge or mid-height | Dresses, coats, trousers |
| Open shelves | Mid-height | Bags, folded sweaters, display |
| Drawers | Low eave zones | Underwear, accessories, knitwear |
| Shoe racks/cubbies | Low eave zones | All footwear |
Organize by frequency: daily-use items at eye level in the standing zone, seasonal pieces in the low eave drawers or upper shelves.
Tip 5: Invest in Custom Built-In Cabinetry
Off-the-shelf modular systems are built for rectangular rooms. In an attic, every corner, every angle, and every transition between headroom zones is a place where a standard system fails.
Custom cabinetry built to the precise pitch and dimensions of your roofline eliminates wasted space and creates the seamless look that freestanding furniture cannot achieve. It also opens up integrated features that elevate function:
- LED lighting inside compartments and along rod sections
- Pull-out valet rods for outfit staging
- Velvet-lined jewelry drawers
- Glass-front display cabinets for bags and shoes
The Kitchen Factory's design team, which has served homeowners across Studio City, Bel Air, and the greater Los Angeles area for over 30 years, approaches attic closet cabinetry the same way they approach a luxury kitchen build: every dimension is confirmed on-site before production begins, and the cabinetry is designed around how you actually live in and use the space.
Tip 6: Add a Center Island If the Floor Plan Allows
Once the perimeter storage is mapped out, consider whether the floor plan has room for more. If your attic's standing-height zone is 8 feet or more in width, a low center island adds meaningful storage and a flat surface for outfit layout, folding, and accessory staging — the same logic as a kitchen island, applied to a closet.
Keep the island under 36 inches in height so it doesn't block sightlines across the space. Position it so there's at least 36 inches of clearance on either side.
Tips 7–9: Light, Mirrors, and Finishes
Tip 7: Maximize Light with Skylights and Layered Artificial Lighting
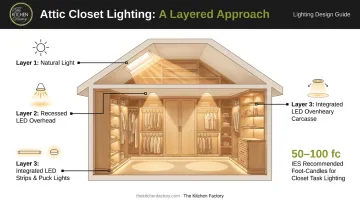
A dark attic closet is functionally unusable. Without adequate light, matching colors and spotting wear on garments becomes genuinely difficult. A layered approach works best:
- Skylight or roof window — natural light where the roofline rules out standard windows. ENERGY STAR certified skylights can reduce heating and cooling costs by up to 13% compared with non-certified products. In a Los Angeles climate, specify low-SHGC glazing to limit summer heat gain.
- Recessed overhead fixtures — ambient illumination throughout the space. Recessed LEDs are the standard choice here.
- Integrated LED strip or puck lights — inside cabinets, along rod sections, and at toe-kick level for task lighting. PacLights, citing IES guidance, recommends 50–100 foot-candles for walk-in closet visibility.
Note that IRC E4003.12 requires enclosed fixtures in clothes closets — recessed and surface-mounted LEDs qualify; open incandescent lamps and pendants do not.
A 2021 MDPI study found that illuminated walls and peripheral lighting increase perceived room size in interior settings. For an attic closet where every square foot counts, that effect is worth designing for deliberately.
Tip 8: Use Mirrors to Open Up the Space
The same light you've layered in Tip 7 becomes more effective when mirrors are in play. Full-length mirrors serve double duty in an attic closet: they function as dressing mirrors and visually expand a low-clearance space by adding depth and bouncing light back into the room.
Best placements:
- Mirrored panels on flat gable-end walls
- Mirror-front cabinet doors along a full section
- A full-length mirror mounted on the inside of the closet door
Avoid placing mirrors on sloped sections — they reflect the ceiling angle in a way that emphasizes the taper rather than counteracting it.
Tip 9: Elevate with Wallpaper, Rugs, and Statement Lighting
Because sloped walls limit usable surface area, wallpaper goes further in an attic than in almost any other room. A single patterned or textured accent wall on the gable end can transform the feel of the entire space — and because you're covering a fraction of what a full room would require, the material cost stays low.
Layer in:
- An area rug to define the standing zone and add warmth underfoot
- A statement pendant or small chandelier at the ridge (ensure it meets E4003.12 closed-fixture requirements)
- A vanity stool or small upholstered bench near a mirror
Details like these are where a storage room becomes a space worth designing — and where the investment in a custom attic closet starts to justify itself.
Common Mistakes to Avoid
Skipping the structural and climate assessment. Installing a wardrobe in an uninsulated attic is a material-risk problem, not just a comfort issue. Heat acceleration alone can roughly double textile deterioration rate for every 5°C increase in temperature (Canadian Conservation Institute). The pre-build inspection is non-negotiable.
Using the wrong storage system for the ceiling type. Standard floor-to-ceiling units against sloped walls create dead space and require expensive redesigns later. The ceiling pitch must dictate the storage configuration.
Underestimating lighting needs. An attic closet without both ambient and task lighting is functionally unusable for daily dressing. Plan for layered light from the start — retrofitting fixtures into finished attic ceilings is costly and disruptive.
Frequently Asked Questions
Can any attic be converted into a walk-in closet?
Not all attics qualify. Minimum requirements include at least 7 feet of ridge clearance, adequate floor load capacity (30 psf minimum), sufficient floor area, and the ability to maintain stable temperature and humidity. Start with a pre-build assessment by a licensed contractor.
How much headroom do you need for an attic walk-in closet?
You need at least 7 feet at the ridge to hang full-length garments comfortably. Areas with 3–5.5 feet of clearance can still support shelving, drawers, and shoe storage along the eaves — they just can't accommodate hanging rods or standing occupancy.
How do you handle slanted ceilings when designing an attic closet?
Use a zone-based approach: position hanging rods and full-height units at the tallest ridge area, and design custom built-in drawers, pull-out racks, and shoe shelving specifically to fit the low eave zones where the ceiling slopes closest to the floor.
What is the best lighting for an attic walk-in closet?
Layer three sources: a skylight for natural light, recessed overhead fixtures for ambient illumination, and integrated LED cabinet or rod lighting for task visibility. Specify low-SHGC skylight glazing for Los Angeles's climate to minimize summer heat gain.
Should you choose built-ins or freestanding storage for an attic walk-in closet?
Built-ins are the better choice in attic environments — they can be fabricated to follow the exact roofline pitch, leaving no wasted space. Freestanding units work as a budget or temporary solution only in attic zones with relatively flat ceiling areas.
How much does it cost to convert an attic into a walk-in closet?
According to HomeAdvisor's 2025 data, finishing an attic averages $20,000 with a typical range of $7,500–$35,000. Custom closet cabinetry adds $28–$40 per square foot on top of that. Budget attic finishing, structural or HVAC work, and cabinetry as separate line items.